
Run AWS Lambda locally, within your docker-compose stack. In this post I am going to show you a neat way to run AWS lambda locally, without the need of AWS SAM. This will enable you to quickly integrate this into your current docker compose development set-up. I will also show you an example of how to run integration tests against your function.
Introduction
The lists below describe the environment and versions I used for this post, and potential other requirements.
Environment
The environment set-up is not set in stone. An older or newer version of a certain dependency may or may not work. The same applies to the system used, you might use a different OS, but certain steps could be different. Try to mimic your local environment as much as possible, to avoid any configuration errors unrelated to the post.
- Docker: 20.10.17
- System: Macbook Pro M1 Max – Running Ventura 13.0 – Docker installed with Docker Desktop
Other requirements
- None
👉 The Github repo for this blog post
Today’s topic: Run AWS Lambda locally
In this blog post we will explore the capabilities to run AWS Lambda locally. We will set-up a simple local development stack with docker compose and pytest.
This set-up makes it easy to integrate AWS Lambda into your current stack, without going through the hassle of introducing a new workflow with a tool like AWS SAM. You can just keep using the stuff your team already uses; native docker! Very useful for when you e.g. would like to gradually move out certain parts of your monostack, into microservices. Or when you are building a new, fully serverless app.
Exciting stuff, so let’s start! 🚀
Setting up the workspace
This will go over the the basic file and folder set-up that is required to follow along, if you’d like to skip that and just see the full example, you can fork/clone my repository.
Create folders and files
Let’s continue. Run the following one-off command to generate all the required folders and files:
mkdir -p hello_world_lambda/src pytest_env/tests && \
        touch docker-compose.yml && \
        cd hello_world_lambda && touch requirements.txt src/main.py Dockerfile && cd .. && \
        cd pytest_env && touch requirements.txt tests/test_main.py Dockerfile && cd ..
Setting up docker-compose and the Dockerfiles
In order to run AWS lambda locally, we need a containers! 🏗️
Let’s start with the Dockerfiles, open hello_world_lambda/Dockerfile, and add the configuration below.
FROM public.ecr.aws/lambda/python:3.9

COPY requirements.txt .

RUN  pip3 install -r requirements.txt --target "${LAMBDA_TASK_ROOT}"

ADD src ${LAMBDA_TASK_ROOT}

CMD ["main.lambda_handler"]
I pulled this straight from the AWS docs.
It simply copies the requirements, and adds it to the lambda task root. Then continues with installing the dependencies, and adding the src folder into the lambda task root. Then the file ends with the cmd that triggers the lambda handler.
The AWS base images for Lambda include the runtime interface emulator (RIE). This will be used to run AWS lambda locally.
The AWS Lambda Runtime Interface Emulator (RIE) is a proxy for the Lambda Runtime API that allows you to locally test your Lambda function packaged as a container image. The emulator is a lightweight web server that converts HTTP requests into JSON events to pass to the Lambda function in the container image.
Now add the pytest_env/Dockerfile. This is just a basic python Dockerfile configuration, with tail -f /dev/null as the command, to keep the container alive.
FROM python:3.11-slim-buster

WORKDIR /usr/src/app

COPY ./requirements.txt /usr/src/app

RUN pip install --upgrade pip
RUN pip install --no-cache-dir -r ./requirements.txt

COPY . /usr/src/app/

CMD tail -f /dev/null
Now let’s continue with the docker-compose.yml file in the root directory, add the following configuration:
version: "3.9"

services:
  hello_world_lambda:
    build: ./hello_world_lambda
    ports:
      - 9000:8080
    volumes:
      - ./hello_world_lambda/src:/var/task
    networks:
      - host

  pytest_env:
    build: ./pytest_env
    volumes:
      - ./pytest_env/tests:/usr/src/app/tests
    networks:
      - host

networks:
  host:
Inside docker-compose.yml we simply set up the lambda container, and the pytest_env container for our tests. We use volumes so that we can edit code on the fly, without rebuilding the container. This is the set-up we will be using to run AWS Lambda locally.
The lambda container runs on port 9000 by default, so therefore we reference that here in the docker-compose file. Final note. We add both containers to the host network, so that they are able to interact with each other.
Lambda handler
Let’s continue with main.py, where we will add the lambda handler code. Open up hello_world_lambda/src/main.py and add the following basic lambda handler:
import json


def lambda_handler(event, context):
    return {
        "statusCode": 200,
        "headers": {"Content-Type": "application/json"},
        "body": json.dumps({"ping": "pong!"}),
    }
Great! That’s it for the workspace set-up. Let’s continue with testing our configuration in the next part.
Testing AWS Lambda locally
With the development workspace set-up, let’s try to run the lambda container and see if we can interact with it. First, spin up the lambda container:
docker compose up hello_world_lambda -d --buildThis will run the image as a container and starts up an endpoint locally at localhost:9000/2015-03-31/functions/function/invocations.
Now you are able to post an event to the following endpoint using a curl command:
curl -XPOST "http://localhost:9000/2015-03-31/functions/function/invocations" -d '{}'Output:
{"statusCode": 200, "headers": {"Content-Type": "application/json"}, "body": "{\"ping\": \"pong!\"}"}How cool is that! 🙌
Since RIE comes included by standard in the AWS managed Lambda base image, we are able to run AWS lambda locally with a simple curl command. There are a few things to remember when working with RIE:
- The RIE does not emulate Lambda’s security and authentication configurations, or Lambda orchestration.
- Lambda provides an emulator for each of the instruction set architectures.
- The emulator does not support AWS X-Ray tracing or other Lambda integrations.
However, besides the things listed above, it fully functions as a production Lambda function would. This is very powerful when combined with integration tests. So let’s write some tests in the next section!
Writing integration tests
In order to test the lambda function we will need pytest and requests, so let’s add these to the requirements.txt file first:
echo pytest >> pytest_env/requirements.txt && echo requests >> pytest_env/requirements.txtNow we can build the container. Since the lambda container is ready to go, we can just build and run both containers together now. The following command will spin up both containers in the background:
docker compose up -d --buildCool! With both containers up, let’s add a failing test inside tests/test_main.py
import requests


def test_lambda_handler():
    response = requests.post(
        url="http://hello_world_lambda:8080/2015-03-31/functions/function/invocations",
        data="{}",
    )
    print(response.json())
    assert 1 == 2
Since we added both containers to the host network inside docker-compose.yml, we are able to use http://hello_world_lambda:8080 here as url.
When doing any type of test driven development, always add a failing test first. We expect this test to fail due to assert 1 == 2. But by failing, we are able to catch our print statement and see the response.
Now, there is one important caveat to remember when you run AWS Lambda locally and you make use of the RIE. You need to restart your container whenever you make changes.
As you can see inside docker-compose.yml we do have a docker volume set-up for the lambda container, so changes will be reflected instantly without rebuilding the container. However, in order for RIE to pick up the new changes and run AWS lambda locally efficiently, the container needs a restart. There are several requests on Github to fix this, which you can find here. But at the time of writing a restart is still required.
In order to combat that, we will run the restart command for the local lambda, right before we run the test. So let’s run our test:
docker compose restart hello_world_lambda && docker compose exec pytest_env pytestOutput:
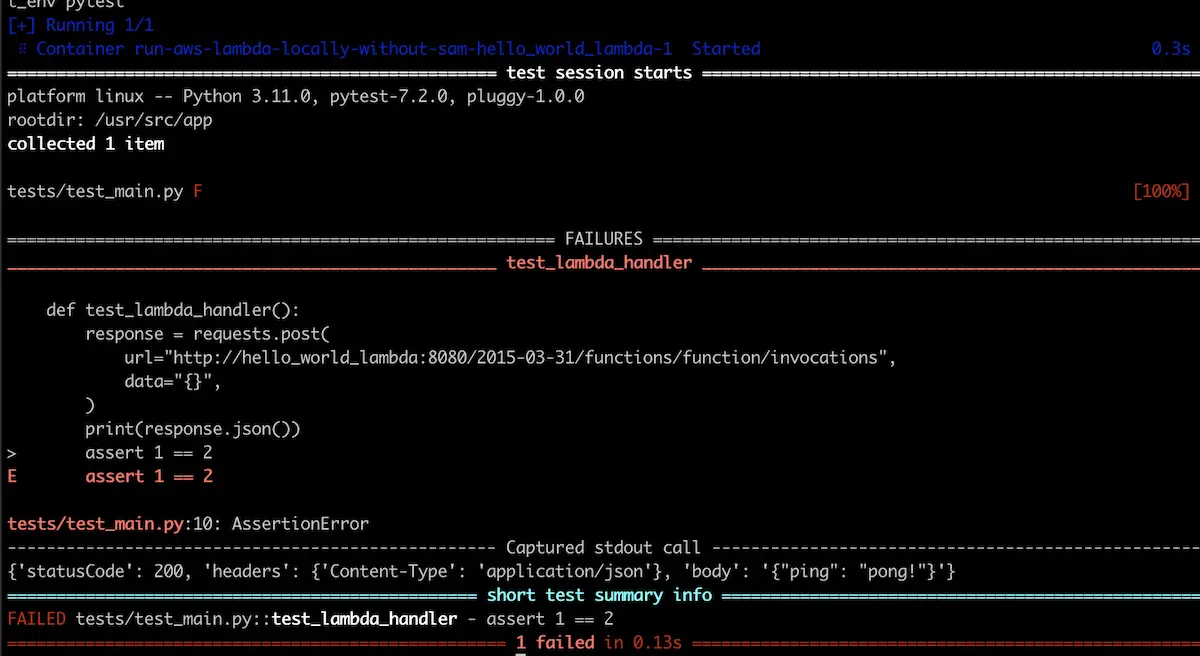
How cool is that! 🚀 We run AWS Lambda locally and are able to run a simple integration test against it.
Now let’s see if we can update the lambda and re-run our test to see the new changes. Let’s update hello_world_lambda/src/main.py to the following:
import json


def lambda_handler(event, context):
    return {
        "statusCode": 200,
        "headers": {"Content-Type": "application/json"},
        "body": json.dumps({"foo": "bar!"}),
    }
Then re-run the test with:
docker compose restart hello_world_lambda && docker compose exec pytest_env pytestOutput:
------------------------------------------------------------------------------------------------ Captured stdout call ------------------------------------------------------------------------------------------------
{'statusCode': 200, 'headers': {'Content-Type': 'application/json'}, 'body': '{"foo": "bar!"}'}
Awesome, everything works as expected. 🙌
Now you know what to do the next time want to run AWS Lambda locally within your docker-compose set-up.
Conclusion
Let’s recap this.
We have set-up a docker compose stack to run AWS lambda locally by utilizing the RIE. Then we wrote a simple integration test to test out functionality. Some of the next steps could involve: writing real integration tests, and adding them to your CI/CD flow! Anyway, that’s all for today.
See you next time! 👋
Want to read some more? Check out my other posts.