FastAPI lambda container, a simple serverless solution. In this post I am going to show you how to run a FastAPI lambda container on AWS. It will be a single Lambda function with an API gateway endpoint attached to it. To handle internal routing we will use the library, Mangum. Deployment will be done through Terraform.
Introduction
The lists below describe the environment and versions I used for this post, and potential other requirements.
Environment
The environment set-up is not set in stone. An older or newer version of a certain dependency may or may not work. The same applies to the system used, you might use a different OS, but certain steps could be different. Try to mimic your local environment as much as possible, to avoid any configuration errors unrelated to the post.
- Docker: 20.10.17
- Terraform: 1.3.5
- System: Macbook Pro M1 Max – Running Ventura 13.0 – Docker installed with Docker Desktop
Other requirements
- AWS account
- AWS credentials set-up with the proper IAM permissions
👉 The Github repo for this blog post
Today’s topic: FastAPI lambda container
In this blog post we will deploy a FastAPI lambda container using AWS Lambda. This will enable you to have a serverless architecture for your FastAPI apps. That means:
- Infinite scaling
- No downtime
- No maintenance
- Relatively cheap to run
Exciting, let’s start! 🚀
Background
AWS Lambda container image
In December 2021, AWS announced container support for Lambda functions. That means that you can now package and deploy Lambda functions as container images of up to 10GB in size.
That is a total game changer, since it allows you to easily add dependencies without the usage of layers. It also means that you won’t have to zip your functions anymore and it integrates seamlessly into your current docker/docker-compose stack. 😄
Just like functions packaged as ZIP archives, functions deployed as container images benefit from the same operational simplicity, automatic scaling, high availability, and native integrations with many services.
Multiple benefits come with running Lambda functions as container images:
- Better dependency management
- Version control (using Docker image tags)
- Easy integration into your CI/CD pipeline
- Better testing capabilities (run your Lambda runtime locally)
What is FastAPI?
If you aren’t yet familiar with it, FastAPI is a modern, fast (high-performance), web framework for building APIs with Python, based on standard Python type hints.
It’s high performance, on par with NodeJS and Go thanks to the usage of Starlette and Pydantic. It’s very easy to write and you need a minimal amount of code to create a robust API.
Besides that, it comes packed with fully automatic interactive documentation for your API endpoints, which is super neat! Less time writing the API docs, more time coding the actual app.
Setting up the workspace
This will go over the the basic file and folder set-up that is required to follow along. To avoid basic repetitive project configuration, we will be re-using a FastAPI docker example from a different article, located in this repository. Some tweaking will be required to be able to deploy that as an FastAPI lambda container image.
Next to that, I pre-created a Terraform example that we will use to deploy our FastAPI lambda function.
From this point on, I am going to assume that you have an AWS account and that you have set-up your AWS keys in your ~/.aws directory. Besides that, you’ll need the proper IAM permissions to be able to deploy all the resources to AWS.
Let’s start with generating some folders:
mkdir fastapi_lambda && cd fastapi_lambda && mkdir api opsNow let’s clone two of the starter templates I made, into the right folders:
git clone https://github.com/rafrasenberg/terraform-lambda-rest-api.git ./ops && \
git clone https://github.com/rafrasenberg/fastapi-docker-example ./api
Configuring FastAPI
With both projects cloned into their respective local folders, let’s start with the configuration of FastAPI.
You’ll be greeted with the following files (some files are hidden for readability):
.
├── api/
│   ├── app/
│   │   ├── src/
│   │   │   ├── __init__.py
│   │   │   └── main.py
│   │   ├── Dockerfile
│   │   └── requirements.txt
│   └── docker-compose.yml
└── ops/
    └── ..
First, we need to update the requirements.txt file and add mangum.
Mangum is an adapter for running ASGI applications in AWS Lambda to handle Function URL, API Gateway, ALB, and Lambda@Edge events. It is intended to provide an easy-to-use, configurable wrapper for any ASGI application. It is compatible with application frameworks, such as Starlette, FastAPI, Quart and Django.
Let’s add it to the requirements file:
fastapi==0.87.0
uvicorn==0.20.0
mangum==0.17.0
Now we will continue with updating the main.py file. Add the following:
from fastapi import FastAPI
from mangum import Mangum

app = FastAPI(
    title="My Awesome FastAPI app",
    description="This is super fancy, with auto docs and everything!",
    version="0.0.1",
)


@app.get("/ping", name="Healthcheck", tags=["Healthcheck"])
async def healthcheck():
    return {"success": "pong!"}


handler = Mangum(app)
Here we create a simple /ping endpoint to test our app with. As you can see, since FastAPI runs on Starlette we can use async Python here! 😄
At the end of the file, Mangum wraps around the FastAPI app and is specified as the handler, to allow usage as a FastAPI lambda function.
The final thing we need to add is the --reload flag inside the docker command, so that route changes are picked up automatically and the app reloads accordingly. This will be very useful for local development. So inside docker-compose.yml, update line 10 to:
command: "uvicorn main:app --proxy-headers --host 0.0.0.0 --port 8484 --reload"Let’s test out the API endpoint locally, by spinning up the docker container. Within the api folder, run:
docker compose up --buildThis will build the container and run it. Here I am specifically not detaching the container so we can use the terminal for debugging purposes, since FastAPI will log output there.
With your image build and FastAPI running in your container, test the API by visiting browser or running curl against localhost:8484
curl localhost:8484/pingOutput:
{"success":"pong!"}Great! Everything is working 🚀
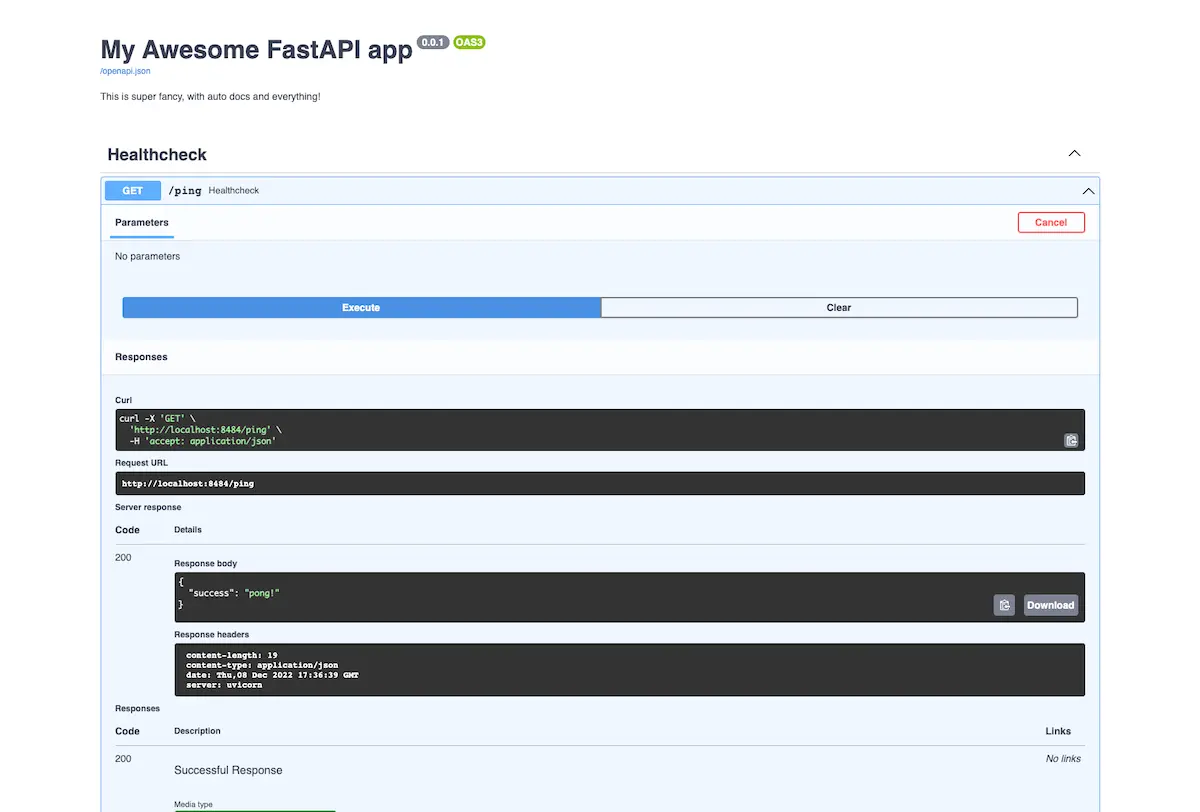
A really neat feature that’s built into FastAPI, is the interactive auto doc feature. Visit localhost:8484/docs to see it in action.
Try firing the endpoints, you can do it straight from the docs!
You can focus on writing your API code, while FastAPI is taking care of the documenting part. This becomes especially useful when your app scales and you are working with larger, decoupled teams.
Deploying FastAPI lambda with Terraform
With FastAPI running locally and ready to go, let’s continue with the deployment through Terraform.
As said earlier, I created a Terraform example which has all the right infrastructure pre-configured. All we have to do is fill in the right variables and run the deploy! I will not be going over the Terraform code, since that is out of the scope for this article, but in the future I might write a separate article about it.
Let’s take a look at the structure of the ops folder (some files are hidden for readability):
.
├── api/
│   └── ..
└── ops/
    ├── lambda_rest_api/
    │   └── ..
    ├── api.tf
    └── settings.tf
Let’s start with the settings.tf file. In here we need to specify the aws region that we want to deploy our FastAPI lambda into, and the profile under which your AWS credentials are stored. The default values are us-east-1 and default , update them accordingly to your desired setting.
terraform {
  required_providers {
    aws = {
      source  = "hashicorp/aws"
      version = "~> 4.40"
    }
  }
}

provider "aws" {
  profile = "default"
  region  = "us-east-1"
}
With that done, let’s continue with api.tf. That is the final file we need to edit before we can deploy our FastAPI lambda, it’s that simple!
First, specify the local_dir_to_build variable. We will point this to the directory where the FastAPI code lives. Second, on line 5, we need to specify the production Dockerfile. We still need to create that, which we will do before the deployment.
Then on lines 6-8 we add the required AWS configuration variables. And on lines 10-12 the names we are going to use and the description of the Lambda function.
Finally on line 13 is the api_stage , which will be the stage we use to deploy the AWS API gateway. To read more about what a stage means in the context of AWS API Gateway, you can read some more through the AWS docs.
module "lambda_function" {
  source                   = "./lambda_rest_api"

  local_dir_to_build       = "../api/app"
  docker_file_name         = "Dockerfile.prod"
  aws_account_id           = "123456789999"
  aws_region               = "us-east-1"
  aws_profile              = "default"

  local_image_name         = "fastapi_lambda"
  aws_function_name        = "fastapi_lambda"
  aws_function_description = "This contains a FastAPI lambda Rest API"
  api_stage                = "dev"
}

output "base_url" {
  value = module.lambda_function.base_url
}
As you can see in the code above, we reference a file that does not exist yet: Dockerfile.prod
So let’s create that. Create a Dockerfile.prod inside api/app , with the following configuration:
FROM public.ecr.aws/lambda/python:3.9

COPY requirements.txt ${LAMBDA_TASK_ROOT}

RUN python3 -m ensurepip
RUN pip install -r requirements.txt

ADD src ${LAMBDA_TASK_ROOT}

ENV PYTHONPATH "${PYTHONPATH}:${LAMBDA_TASK_ROOT}"

CMD [ "main.handler" ]
This code comes straight from the AWS docs.
We use the AWS provided base image here, and we simply copy the requirements, and add it to the lambda task root. Then we continue with installing the dependencies, and adding the src folder into the lambda task root. Then the file ends with the cmd that triggers the handler which is our FastAPI lambda app wrapped in mangum.
All done! 😎 Time to deploy.
Inside the ops folder, run the following command to prepare terraform:
terraform initWith terraform set-up, let’s generate a plan to verify everything is configured correctly:
terraform planYou will see all the resources that will be created, and if you don’t run into any errors, it’s time to deploy our FastAPI lambda function! 🚀
terraform apply -auto-approveOutput:
.......
module.lambda_function.aws_api_gateway_integration.lambda_root: Creation complete after 1s [id=agi-psgtrtezd7-67w3jkutx4-ANY]
module.lambda_function.aws_api_gateway_integration.lambda: Creation complete after 1s [id=agi-psgtrtezd7-7x0ptr-ANY]
module.lambda_function.aws_api_gateway_deployment.this: Creating...
module.lambda_function.aws_api_gateway_deployment.this: Creation complete after 0s [id=02qtxu]

Apply complete! Resources: 12 added, 0 changed, 0 destroyed.

Outputs:

base_url = "https://psgtrtezd7.execute-api.us-east-1.amazonaws.com/dev"
Awesome! Our FastAPI lambda container is up and running! 🎉
You should see similar output, except for the endpoint, which will be different. Now let’s quickly give a high level overview of what is going on in the background, when using the lambda terraform module that I created:
- A file watcher is watching for changes in the directory that you provided through
local_dir_to_build. - Based of the
Dockerfile.prod, an image is built locally and pushed to ECR. - The FastAPI Lambda function is created with that image, and the right IAM permissions are attached.
- An API Gateway is set-up for the FastAPI Lambda function.
- In the end, the API Gateway URL is provided as an output.
Let’s try and curl the endpoint to verify that it is working:
curl https://psgtrtezd7.execute-api.us-east-1.amazonaws.com/dev/pingOutput:
{"success":"pong!"}That was easy! Now you have a single serverless FastAPI Lambda function running, with an API gateway endpoint attached to it. With magnum fully configured to handle the routing. Awesome! 🙌
Fixing the docs
Now as you remember from testing out FastAPI locally earlier, it comes packed with automatic interactive docs. So let’s try to access them from the browser on our new serverless Lambda. Visit your endpoint in the browser, and you’ll see… that it is not working.
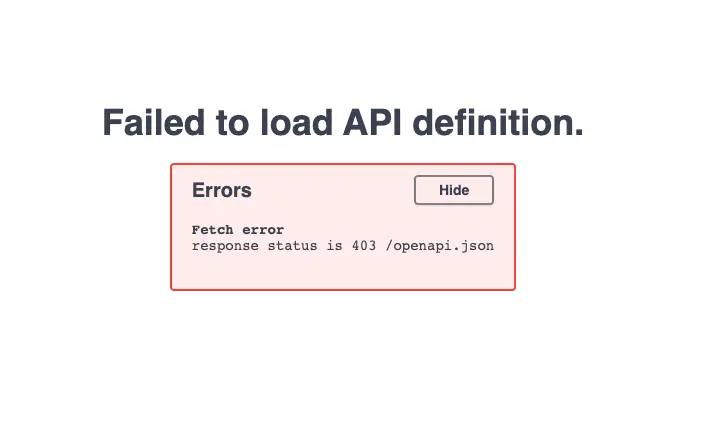
This is due to the way that the routing is configured. Since AWS API Gateway is adding a stage to the url and thus the root of the app is at /dev, the docs are not working. It’s trying to look for the /openapi.json , but that should be dev/openapi.json.
Let’s update our FastAPI lambda to combat that problem:
import os
from fastapi import FastAPI
from mangum import Mangum

api_stage = os.environ.get("API_STAGE", "")

app = FastAPI(
    root_path=f"{api_stage}",
    docs_url="/docs",
    title="My Awesome FastAPI app",
    description="This is super fancy, with auto docs and everything!",
    version="0.0.1",
)


@app.get("/ping", name="Healthcheck", tags=["Healthcheck"])
async def healthcheck():
    return {"success": "pong!"}


handler = Mangum(app)
We want a flexible infrastructure, and thus the stage should be dynamic. You might want to use test or prod instead of dev as the stage. Therefore we use an environment variable here. We set the root_path, to make sure that we append the stage in production.
By using os.environ.get("API_STAGE", ""), we make sure that we can still access the docs locally. If we don’t provide any variable, it will default to a blank string and thus the root without any prefix.
To add the variable into the FastAPI Lambda runtime, update the api.tf and add the new configuration on line 15 to the FastAPI lambda function module:
module "lambda_function" {
  source = "./lambda_rest_api"

  local_dir_to_build = "../api/app"
  docker_file_name   = "Dockerfile.prod"
  aws_account_id     = "123456789"
  aws_region         = "us-east-1"
  aws_profile        = "default"

  local_image_name         = "fastapi_lambda"
  aws_function_name        = "fastapi_lambda"
  aws_function_description = "This contains a FastAPI lambda Rest API"
  api_stage                = "dev"

  lambda_runtime_environment_variables = {
    API_STAGE = "/dev"
  }
}
Now, let’s deploy these new changes:
terraform apply -auto-approveWith that done, try visiting the docs again.
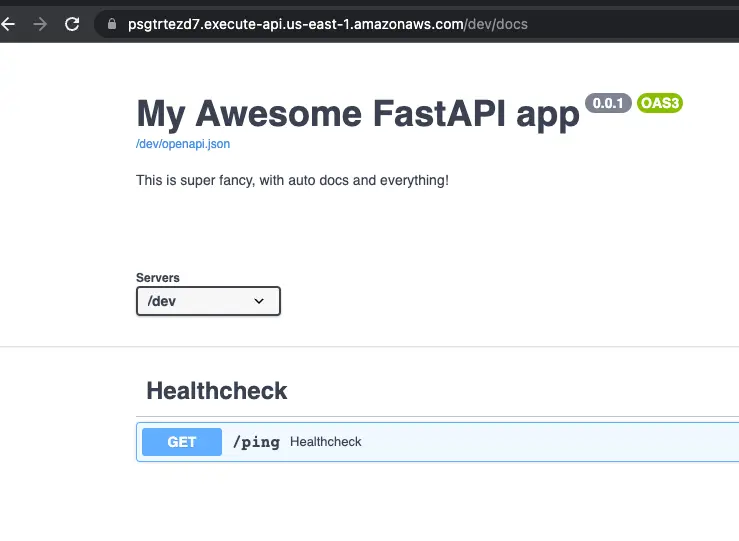
Awesome! Everything is working as expected. 🎉
That’s very cool that we got all of that working inside a serverless lambda, but you might want a little more than just a /ping endpoint. So let’s extend our FastAPI lambda a little more, so we can truly see the power of mangum handling internal routing within a single Lambda container image.
Expanding the API
Let’s add some new endpoints. Add the following files to the src folder:
.
└── src/
    ├── api_v1/
    │   ├── users/
    │   │   └── users.py
    │   └── api.py
    └── main.py
We can really structure our app well, by using nested routing. This makes our app clean and keeps our code separated. You could make multiple modules for different parts of your API.
In the api.py file, add the following code:
from fastapi import APIRouter

from .users import users

router = APIRouter()

router.include_router(users.router, prefix="/users", tags=["Users"])
Then within the users.py file, add the following routes:
from fastapi import APIRouter

router = APIRouter()


@router.get("/{id}")
async def get_user():
    results = {"Success": "This is one user!"}
    return results


@router.get("/")
async def get_users():
    results = {"Success": "All users!"}
    return results
And finally, the last step is adding the router app to the main.py file:
import os
from fastapi import FastAPI
from mangum import Mangum
from api_v1.api import router as api_router

api_stage = os.environ.get("API_STAGE", "")

app = FastAPI(
    root_path=f"{api_stage}",
    docs_url="/api/v1/docs",
    title="My Awesome FastAPI app",
    description="This is super fancy, with auto docs and everything!",
    version="0.0.1",
)


@app.get("/ping", name="Healthcheck", tags=["Healthcheck"])
async def healthcheck():
    return {"success": "pong!"}


app.include_router(api_router, prefix="/api/v1")

handler = Mangum(app)
Assuming your development container is still running locally, visit localhost:8484/api/v1/users. It works! Awesome. 🔥
Also, check out /docs to see the newly updated docs:
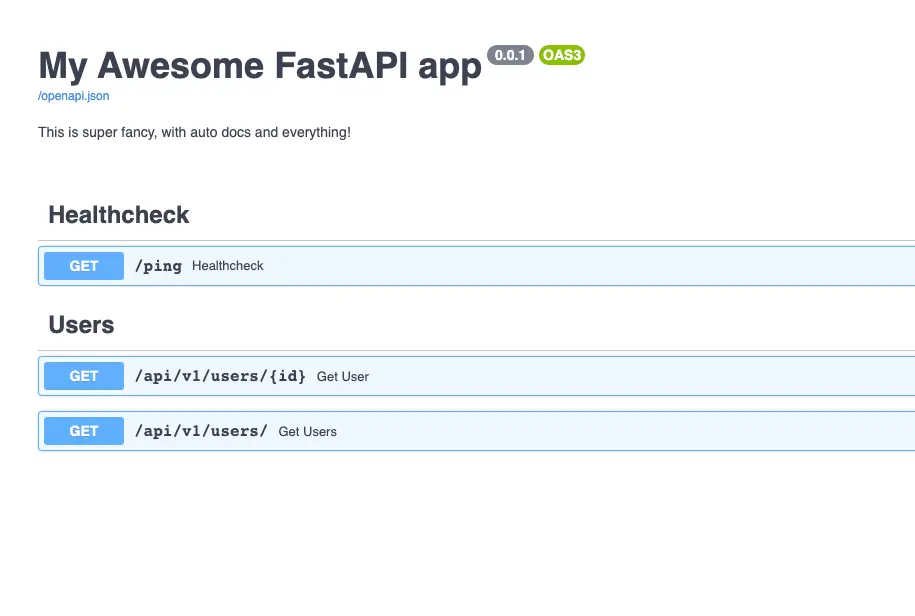
As you can see, the new endpoints are working. Note the prefix we use here /api/v1.
It’s always good practice to version your APIs. When your app grows, you might plan on releasing a new API with breaking changes for your end-user. By versioning it, you could just start developing in a new folder api_v2 and create a new prefix /api/v2 for it. This will give your users time to switch over while slowly deprecating your old API.
Let’s deploy the new changes to our remote FastAPI Lambda function:
terraform apply -auto-approveNow try out the new endpoints!
Visit the /api/v1/users endpoint first. As you can see, we get the right response back:
{"Success":"All users!"}Now let’s try our dynamic endpoint by visiting e.g. /api/v1/users/1. It returns:
{"Success":"This is one user!"}Awesome! As you can see our FastAPI lambda is working perfectly and all internal routing is properly handled. 🚀
Bonus: Integration tests
You deployed your FastAPI lambda container. That’s great, but how to go from here? A real production application needs integration tests! If you’d like to learn how to handle that, read that in this blog.
Conclusion
Let’s recap this.
In this blog post we deployed a FastAPI lambda function on AWS as a container image.
We used mangum to wrap around our app, to allow internal routing within the deployed function. We ran a simple deploy through Terraform and added some new routes. Now it’s up to you, to implement the logic behind these API routes and further productionize! That’s all for today.
See you next time! 👋
Want to read some more? Check out my other posts.
Awesome blogpost! Only one thing: make sure you align the python versions in Dockerfile and Dockerfile.prod, especially nowadays for FastAPI for Union and “|” operator, I got this error for example (only when enabling cloudwatch logs) in AWS
>TypeError: unsupported operand type(s) for |: ‘types.GenericAlias’ and ‘NoneType’
Thanks a lot for the blogpost amigo!
Thank you Dennis. And you are absolutely right. I’ll update the Dockerfile to match the prod Dockerfile in the repo. Great catch!