Setting up Kubernetes Traefik ingress, with Terraform. In this post, we are setting up a managed Kubernetes cluster and load balancer on DigitalOcean, using Terraform. The cluster will be driven by Traefik v2 as our Ingress controller and cert-manager to provide us with free Let’s Encrypt certificates.
Introduction
The lists below describe the environment and versions I used for this post, and potential other requirements.
Environment
The environment set-up is not set in stone. An older or newer version of a certain dependency may or may not work. The same applies to the system used, you might use a different OS, but certain steps could be different. Try to mimic your local environment as much as possible, to avoid any configuration errors unrelated to the post.
- Terraform: 1.3.5
- Helm: 3.10.2
- kubectl: 1.25.4
- doctl: 1.88.0
- System: Macbook Pro M1 Max – Running Ventura 13.0 – Packages installed with
brew
Other requirements
- DigitalOcean account
- Domain name
👉 The Github repo for this blog post
Today’s topic: Kubernetes Traefik Ingress
In this blog post we will dig into container orchestration. We will configure a kubernetes traefik ingress stack where Traefik will serve as the cluster ingress controller.
The Kubernetes Traefik ingress provider is a Kubernetes Ingress controller; it manages access to a cluster services by supporting the Ingress specification. Traefik v2 will watch for incoming ingresses events, and derives the corresponding dynamic configuration from it, which in turn will create the resulting routers, services, handlers, etc.
First we will go over setting up the Kubernetes Traefik ingress stack through terraform, and then we will do some example deployments. Exciting, let’s go! 🚀
Infrastructure as Code (IaC) with Terraform
What is IaC?
IaC according to Wikipedia:
Infrastructure as code is the process of managing and provisioning computer data centers through machine-readable definition files, rather than physical hardware configuration or interactive configuration tools.
A little complex and full of buzzwords, so let’s rewrite that into something short and understandable:
Infrastructure as code (IaC) means to manage your IT infrastructure using configuration files.

Before IaC, IT personnel would have to manually change configurations to manage their infrastructure. With IaC, your infrastructure’s configuration takes the form of a code file.
Since it’s just text, it’s easy for you to edit, copy, and distribute it. You can and should put it under source control, like any other source code file.
Some of the benefits of Infrastructure as Code are:
- Faster development
- More consistency
- Accountability
- Higher efficiency
- Lower costs
In this blog post, we will use the famous IaC tool, Terraform.
What is Terraform?
Terraform is a tool for building, changing, and versioning infrastructure safely and efficiently. Terraform can manage existing, popular service providers as well as custom solutions. ✅
The infrastructure Terraform can manage includes low-level components such as compute instances, storage, and networking, as well as high-level components such as DNS entries, SaaS features, etc.
Choosing a cloud provider
For this blog post, I chose a managed Kubernetes cluster on Digital Ocean, since it is perfect to just start out and explore Kubernetes.
It’s a cheaper alternative than AWS EKS since launching a managed cluster + load balancer will only cost you around ~$30 per month whereas AWS EKS will set you back at least $75 per month ($0.10 / hour). And this excludes the Load Balancer, NAT gateway etc.
So for just hacking around, I prefer Digital Ocean as it is an easy and inexpensive way to get started. But for critical production environments, I would not advise using Digital Ocean because compared to AWS EKS it doesn’t really compete when looking at flexibility, scalability, and maturity.
You don’t want to pay? I get it! If you sign up through this link, you will get $100 worth of credit for free. Which means 3 full months of free Kubernetes! ❤️
Setting up Terraform
The first thing we are going to do is prepare our workspace. Let’s create a folder and cd into it.
mkdir do_k8_config && cd do_k8_configThe first file we are going to create is 01_backend.tf. This will basically have the base configuration and will tell us which version of Terraform and providers to use.
A provider is responsible for understanding API interactions and exposing resources. Most providers configure a specific infrastructure platform (either cloud or self-hosted). For this tutorial we will need the digitalocean , kubernetes, and helm providers.
terraform {
  required_version = "~> 1.3.5"
  required_providers {
    digitalocean = {
      source  = "digitalocean/digitalocean"
      version = "~> 2.25.2"
    }
    kubernetes = {
      source  = "hashicorp/kubernetes"
      version = "~> 2.16.0"
    }
    helm = {
      source  = "hashicorp/helm"
      version = "~> 2.7.1"
    }
  }
}
Next up is creating the terraform.tfvars file. This will hold all the variables of the infrastructure. Terraform automatically loads the variables in this file when running the terraform apply command, without needing the specify the -var-file="foo.tfvars" flag.
Best practices when working with larger codebases would be to split this variable file into several variable files each corresponding to a certain part of your configuration. But for the simplicity of this blog post, we will store all of it in one file.
The first variable we need to specify is the API token of Digital Ocean. This is needed so Terraform can communicate with the Digital Ocean provider.
To get the Digital Ocean API token, log in, and find your account settings. Generate one if you hadn’t already. Then replace the variable below with your token.
do_token = "super-secret"Now let’s create the provider.tf file.
Terraform configurations must declare which providers they require so that Terraform can install and use them. Additionally, some providers require configuration (like endpoint URLs or cloud regions) before they can be used.
variable "do_token" {
  type        = string
  description = "Digital Ocean token."
}

provider "digitalocean" {
  token = var.do_token
}
Your current folder structure should look like this right now:
.
└── do_k8_config/
    ├── 01_backend.tf
    ├── provider.tf
    └── terraform.tfvars
Configuring the cluster
Next up is our cluster configuration. Create a file and name it 02_cluster.tf. In there we first declare the variables that we are going to use. Some variables that we are declaring here are the cluster name, the region and the node size.
variable "cluster_name" {
  type        = string
  description = "Cluster name that will be created."
}
variable "cluster_region" {
  type        = string
  description = "Cluster region."
}
variable "cluster_tags" {
  type        = list(string)
  description = "Cluster tags."
}
variable "node_size" {
  type        = string
  description = "The size of the nodes in the cluster."
}
variable "node_max_count" {
  type        = number
  description = "Maximum amount of nodes in the cluster."
}
variable "node_min_count" {
  type        = number
  description = "Minimum amount of nodes in the cluster."
}
Next up is the actual cluster configuration and the connection to the Kubernetes and Helm (the package manager) providers.
If you really want to dive more into Terraform configuration, I highly suggest to check out the docs of each provider, since it is too much to go over all the config settings here in this blog. The docs are really good!
So inside 02_cluster.tf, add the following configuration:
data "digitalocean_kubernetes_versions" "do_cluster_version" {
  version_prefix = "1.24."
}

resource "digitalocean_kubernetes_cluster" "do_cluster" {
  name         = var.cluster_name
  region       = var.cluster_region
  auto_upgrade = true
  version      = data.digitalocean_kubernetes_versions.do_cluster_version.latest_version
  tags         = var.cluster_tags

  node_pool {
    name       = "${var.cluster_name}-pool"
    size       = var.node_size
    min_nodes  = var.node_min_count
    max_nodes  = var.node_max_count
    auto_scale = true
  }
}

provider "kubernetes" {
  host             = digitalocean_kubernetes_cluster.do_cluster.endpoint
  token            = digitalocean_kubernetes_cluster.do_cluster.kube_config[0].token
  cluster_ca_certificate = base64decode(
    digitalocean_kubernetes_cluster.do_cluster.kube_config[0].cluster_ca_certificate
  )
}

provider "helm" {
  kubernetes {
    host             = digitalocean_kubernetes_cluster.do_cluster.endpoint
    token            = digitalocean_kubernetes_cluster.do_cluster.kube_config[0].token
    cluster_ca_certificate = base64decode(
      digitalocean_kubernetes_cluster.do_cluster.kube_config[0].cluster_ca_certificate
    )
  }
}
Next up is updating our terraform.tfvars file to include the new variables. Here you specify things like the region where you want to launch your cluster and the node size. We will be using Digital Ocean’s autoscaling feature, so therefore we are specifying the max and min node count as well.
# 1 Backend variables
do_token = "super-secret"

# 2 Cluster variables
cluster_name   = "my-special-cluster-name"
cluster_region = "nyc1"
cluster_tags   = ["foo", "development"]
node_size      = "s-1vcpu-2gb"
node_min_count = 2
node_max_count = 4
Deploying the Kubernetes cluster
Before we can configure the Kubernetes Traefik ingress, we will obviously need a running cluster! First, run the terraform init command.
This will initialize our Terraform workspace. It is used to initialize a working directory containing Terraform configuration files. This is the first command that should be run after writing a new Terraform configuration or cloning an existing one from version control.
terraform initAs you can see now, a new folder called .terraform is formed, holding the configuration files. Next up is planning our execution plan with the terraform plan command.
The terraform plan command is used to create an execution plan. Terraform performs a refresh, unless explicitly disabled, and then determines what actions are necessary to achieve the desired state specified in the configuration files.
This command is a convenient way to check whether the execution plan for a set of changes matches your expectations without making any changes to real resources or to the state.
The optional -out argument can be used to save the generated plan to a file for later execution with terraform apply, which can be useful when running Terraform in automation.
If Terraform detects no changes to the resource or the root module output values, the Terraform plan will indicate that no changes are required.
So let’s create our execution plan! ⚡
terraform plan -out=terraform.tfplanIf this lead to no errors then everything went well! 😄 You can always check your terminal output so see which changes Terraform is going to apply.
We can now officially deploy our cluster by applying our terraform.tfplan with the following command:
terraform apply "terraform.tfplan"This will take some minutes to finish. When logging in to Digital Ocean, you can see your cluster will now be up and running. Awesome!
Note:
The state is now stored locally in terraform.tfstate. When working with Terraform in a team, use of a local file makes Terraform usage complicated because each user must make sure they always have the latest state data before running Terraform and make sure that nobody else runs Terraform at the same time.
In that case, it is better to store this state remote by using remote state. Terraform writes the state data to a remote data store, which can then be shared between all members of a team. So for best practices when working with production code and a team, use remote state. To keep this tutorial a little shorter I am using the default local terraform.tfstate
Adding the Kubernetes Traefik Ingress controller
With our cluster launched right now, let’s add the kubernetes traefik ingress controller.
Ingress exposes HTTP and HTTPS routes from outside the cluster to services within the cluster. Traffic routing is controlled by rules defined on the Ingress resource.
We will be installing Traefik v2 through the official Helm repository. Helm is a Kubernetes package manager and helps you easily define, install, and upgrade even the most complex Kubernetes applications.
To make Digital Ocean Kubernetes work with the Traefik Helm repository, we need some custom configuration. Create a folder called helm-values and within that folder create a file called traefik.yml.
mkdir helm_values && cd helm_values && touch traefik.ymlIn this traefik.yml file add the following configuration below. This will make sure everything will work properly with cert-manager, which we will configure later on. It also enables the dashboard and will automatically redirect all traffic to TLS. This file overrides the default values for the traefik helm chart, which you can find here.
ingressRoute:
  dashboard:
    enabled: true
    annotations:
      traefik.ingress.kubernetes.io/router.tls: "true"

ports:
  web:
    redirectTo: websecure

additionalArguments:
  - "--log.level=INFO"
  - "--entrypoints.websecure.http.tls"
  - "--providers.kubernetesIngress.ingressClass=traefik-cert-manager"
  - "--ping"
  - "--metrics.prometheus"
Now it is time to configure the Terraform files. The first step is to create a file called 03-ingress.tf. Similar to the previous Terraform files, first declare the variables that are needed:
variable "ingress_gateway_chart_name" {
  type        = string
  description = "Ingress Gateway Helm chart name."
}
variable "ingress_gateway_chart_repo" {
  type        = string
  description = "Ingress Gateway Helm repository name."
}
variable "ingress_gateway_chart_version" {
  type        = string
  description = "Ingress Gateway Helm repository version."
}
In the following section, we will create a Kubernetes namespace for our Traefik service first and then deploy it through Helm. As you can see in here we also specify the custom traefik.yml config that we created earlier.
resource "kubernetes_namespace" "ingress_gateway_namespace" {
  metadata {
    annotations = {
      name = "traefik"
    }
    name = "traefik"
  }
}

resource "helm_release" "ingress_gateway" {
  name      = "traefik"
  namespace = "traefik"
  chart     = var.ingress_gateway_chart_url

  values = [
    file("helm_values/traefik.yml")
  ]
}
At last, we need to update our terraform.tfvars again to enter the new variables.
# 1 Backend variables
do_token = "super-secret"

# 2 Cluster variables
cluster_name   = "my-special-cluster-name"
cluster_region = "nyc1"
cluster_tags   = ["foo", "development"]
node_size      = "s-1vcpu-2gb"
node_min_count = 2
node_max_count = 4

# 3 Ingress variables
ingress_gateway_chart_name    = "traefik"
ingress_gateway_chart_repo    = "https://traefik.github.io/charts"
ingress_gateway_chart_version = "20.5.3"
Now it’s time to create the execution plan and deploy our new Ingress controller to our Kubernetes cluster! As a sanity check, this is what your current folder structure should look like:
.
└── do_k8_config/
    ├── .terraform/
    ├── helm_values/
    │   └── traefik.yml
    ├── 01_backend.tf
    ├── 02_cluster.tf
    ├── 03_ingress.tf
    ├── provider.tf
    ├── terraform.tfstate
    ├── terraform.tfplan
    └── terraform.tfvars
With that out of the way, let’s create our new plan:
terraform plan -out=terraform.tfplanIf everything went well, it’s time to deploy it!
terraform apply "terraform.tfplan"Hoorah, the kubernetes traefik ingress controller is deployed! 🚀
If you check your Digital Ocean dashboard right now and go to the Networking menu, and then the Load Balancers. You’ll see a shiny fresh new load balancer there. I hear you thinking, huh? But we didn’t deploy that?
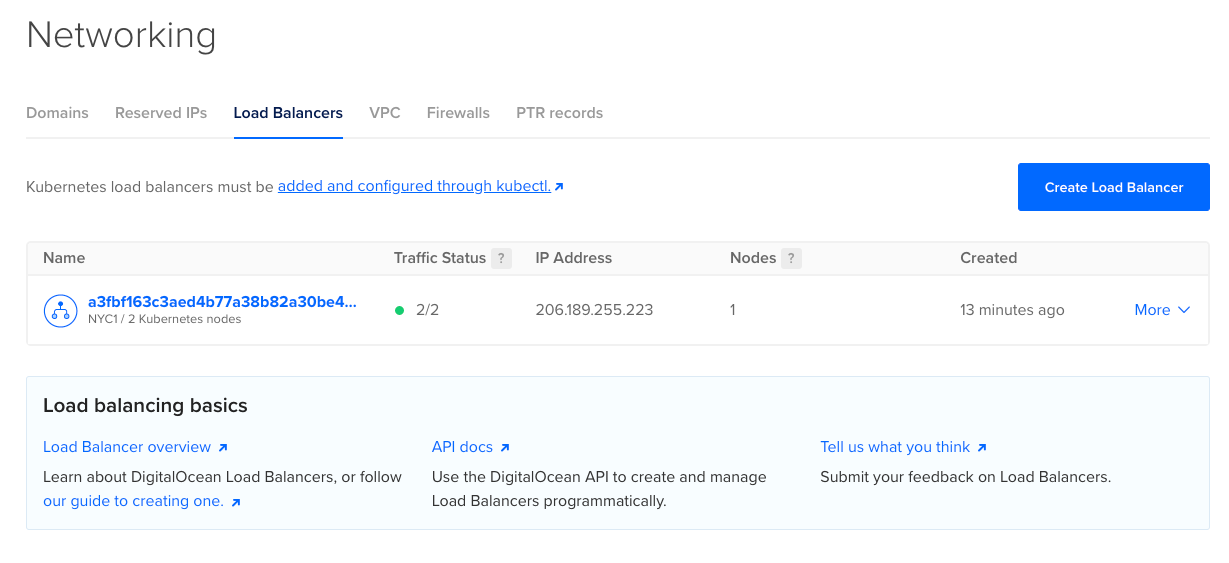
This is the result of using the managed service by Digital Ocean. Whenever a Kubernetes service is declared as type LoadBalancer, then Digital Ocean automatically triggers the creation of that load balancer when you deploy the service.
kind: Service
apiVersion: v1
spec:
  type: LoadBalancer
To read more about load balancing on Digital Ocean Kubernetes, follow this link.
Installing cert manager
The last Terraform configuration that we have to do is that of cert-manager.
Cert-manager builds on top of Kubernetes, introducing certificate authorities and certificates as first-class resource types in the Kubernetes API. This makes it possible to provide ‘certificates as a service’ to developers working within your Kubernetes cluster.
Let’s create a new file called 04-cert-manager.tf. Like we did before, first declare the variables:
variable "cert_manager_chart_name" {
  type        = string
  description = "Cert Manager Helm name."
}
variable "cert_manager_chart_repo" {
  type        = string
  description = "Cert Manager Helm repository name."
}
variable "cert_manager_chart_version" {
  type        = string
  description = "Cert Manager Helm version."
}
Then we create a new namespace for cert-manager within Kubernetes and we deploy it through Helm.
resource "kubernetes_namespace" "cert_manager_namespace" {
  metadata {
    annotations = {
      name = "cert-manager"
    }
    name = "cert-manager"
  }
}

resource "helm_release" "cert-manager" {
  name       = "cert-manager"
  namespace  = "cert-manager"
  chart      = var.cert_manager_chart_name
  repository = var.cert_manager_chart_repo
  version    = var.cert_manager_chart_version

  set {
    name  = "installCRDs"
    value = "true"
  }
}
Then we need to update our terraform.tfvars again to enter the new variables.
# 1 Backend variables
do_token = "super-secret"

# 2 Cluster variables
cluster_name   = "my-special-cluster-name"
cluster_region = "nyc1"
cluster_tags   = ["foo", "development"]
node_size      = "s-1vcpu-2gb"
node_min_count = 2
node_max_count = 4

# 3 Ingress variables
ingress_gateway_chart_name    = "traefik"
ingress_gateway_chart_repo    = "https://traefik.github.io/charts"
ingress_gateway_chart_version = "20.5.3"

# 4 Cert manager variables
cert_manager_chart_name    = "cert-manager"
cert_manager_chart_repo    = "https://charts.jetstack.io"
cert_manager_chart_version = "1.10.1"
And finally, you guessed it right, create our execution plan again!
terraform plan -out=terraform.tfplanNow let’s deploy cert-manager.
terraform apply "terraform.tfplan"Your cluster is now up and running with the Kubernetes Traefik Ingress Controller and cert-manager installed, ready to generate free Let’s Encrypt certificates for the domains you will later point to your cluster.
Interacting with a Kubernetes cluster
In order to interact with our cluster from our local machine, we need kubectl installed.
The Kubernetes command-line tool, kubectl, allows you to run commands against Kubernetes clusters. You can use kubectl to deploy applications, inspect and manage cluster resources, and view logs.
Besides the Kubernetes command-line tool, we also need doctl. This is the official DigitalOcean command-line client. It uses the DigitalOcean API to provide access to most account and Droplet features.
Please follow the docs to install both of these on your machine:
From this moment on I am assuming that you have successfully installed and configured kubectl and doctl.
When those are installed please visit the Digital Ocean dashboard and go to your cluster. There you will find a command to connect to your cluster, for easy multiple-cluster management. Paste that command in your terminal and connect to your cluster.
doctl kubernetes cluster kubeconfig save 33d303ec-4b1e-4972-8e9e-670344a64122Output:
Notice: Adding cluster credentials to kubeconfig file found in "/Users/raf/.kube/config"
Notice: Setting current-context to do-nyc1-my-special-cluster-name
You’re all set!
With the Kubernetes cluster successfully connected, let’s run some commands to verify if our cluster install went as we expected.
kubectl get nodesOutput:
NAME                                 STATUS   ROLES    AGE    VERSION
my-special-cluster-name-pool-my297   Ready    <none>   2d3h   v1.24.4
my-special-cluster-name-pool-my29c   Ready    <none>   2d3h   v1.24.4
As you can see, we can interact with our cluster right now through kubectl, so that means we can deploy some services!
In the previous blog post and what you can see back in your Terraform configuration, is that we deployed two services through Helm:
- Traefik
- cert-manager
So let’s see if they are up and running in our cluster without any errors. Let’s check Traefik first.
We use the get svc (shorthand for get services) command to list all services in the default namespace. As you might remember from our Terraform configuration, we created a traefik namespace and deployed the Traefik Helm repository into that. So therefore we will specify the -n namespace flag, to return all services in that namespace.
kubectl get svc -n traefikOutput:
NAME      TYPE           CLUSTER-IP      EXTERNAL-IP       PORT(S)                      AGE
traefik   LoadBalancer   10.245.40.126   143.244.213.192   80:31596/TCP,443:31638/TCP   155m
Awesome! Our Traefik LoadBalancer is successfully running.
The above output lists the Cluster-IP, the External-IP as well as the target and node-ports the service is running on.
The external IP is the one that is exposed to the outside with the Digital Ocean load balancer behind it. So that will be the IP address where you will be pointing your domain name to.
Now, let’s quickly do the same for cert-manager.
kubectl get svc -n cert-managerOutput:
NAME                   TYPE        CLUSTER-IP       EXTERNAL-IP   PORT(S)    AGE
cert-manager           ClusterIP   10.245.17.145    <none>        9402/TCP   150m
cert-manager-webhook   ClusterIP   10.245.211.207   <none>        443/TCP    150m
As you can see, everything is working as expected! 🚀
Deploying the ClusterIssuer
The first thing we need to do first is deploying the ClusterIssuer that will generate free SSL certificates for us.
What is a ClusterIssuer?
Issuers, and ClusterIssuers, are Kubernetes resources that represent certificate authorities (CAs) that are able to generate signed certificates by honoring certificate signing requests. All cert-manager certificates require a referenced issuer that is in a ready condition to attempt to honor the request.
If you want to create a single Issuer that can be consumed in multiple namespaces, you should consider creating a ClusterIssuer resource. This is almost identical to the Issuer resource, however it is non namespaced so it can be used to issue Certificates across all namespaces.
For this, we will be using ClusterIssuer.
Let’s create the post_deployment folder and in there a 01_cert_manager folder with a 01_issuer.yml file:
mkdir -p post_deployment/01_cert_manager && touch post_deployment/01_cert_manager/01_issuer.ymlWithin the 01_issuer.yml file, add this configuration:
---
apiVersion: cert-manager.io/v1
kind: ClusterIssuer
metadata:
  name: letsencrypt-prod
spec:
  acme:
    email: youremail@gmail.com
    server: https://acme-v02.api.letsencrypt.org/directory
    privateKeySecretRef:
      name: letsencrypt-prod-account-key
    solvers:
      - http01:
          ingress:
            class: traefik-cert-manager
Please make sure you modify the email, this has to be a valid one.
As you can see from the configuration, we are using a http01 solver here. cert-manager offers two methods of validation:
- DNS Validation
- HTTP Validation
When working with different kinds of domains, a HTTP01 validation is the easiest. With a HTTP01 challenge, you prove ownership of a domain by ensuring that a particular file is present at the domain. It is assumed that you control the domain if you are able to publish the given file under a given path.
DNS validation on the other hand is very useful when you are working with an organization’s domain name and you would like to deploy services on subdomains like so: *.yourdomain.com. You can then generate a wildcard certificate and solve the DNS challenge through your DNS provider.
As you might notice here, you see that the http01 ingress class is called traefik-cert-manager. Where did we see that before?
Ah yes! In the custom values file within our Terraform configuration for the Traefik Helm deployment, on line 14.
- "--providers.kubernetesIngress.ingressClass=traefik-cert-manager"Now you know what that is for! 😄
Finally, let’s deploy our ClusterIssuer through kubectl:
kubectl apply -f post_deployment/01_cert_manager/01_issuer.ymlNow with the ClusterIssuer successfully in place, we can start generating certificates for our services.
Exposing the Kubernetes Traefik ingress dashboard
To access the Traefik dashboard, you will need a domain name pointing to the load balancer’s external IP. You can check which IP that is with the kubectl get svc -n traefik command that we explained earlier.
Then in your registrar panel just add an A record pointing to that IP address.
With that done let’s create a folder that will hold our certificates and in there the certificate file for the Traefik dashboard:
mkdir -p post_deployment/certificates && touch post_deployment/certificates/traefik_dashboard.ymlNow edit the traefik_dashboard.yml file and add this:
---
apiVersion: cert-manager.io/v1
kind: Certificate
metadata:
  name: traefik-dashboard-cert
  namespace: traefik
  labels:
    "use-http01-solver": "true"
spec:
  commonName: traefik.yourdomain.com
  secretName: traefik-dashboard-cert
  dnsNames:
    - traefik.yourdomain.com
  issuerRef:
    name: letsencrypt-prod
    kind: ClusterIssuer
Please change the domain/sub-domain name here, to the one you want to use for the Traefik dashboard. If you have done that, run the following command to generate a certificate:
kubectl apply -f post_deployment/certificates/traefik_dashboard.ymlNow wait around a minute or 2 and then run the following command to check if your certificate is ready and you didn’t run into any errors:
kubectl -n traefik describe certificate traefik-dashboard-certOutput:
Status:
  Conditions:
    Last Transition Time:  2022-11-29T20:05:49Z
    Message:               Certificate is up to date and has not expired
    Observed Generation:   1
    Reason:                Ready
    Status:                True
    Type:                  Ready
  Not After:               2023-02-27T19:05:47Z
  Not Before:              2022-11-29T19:05:48Z
  Renewal Time:            2023-01-28T19:05:47Z
  Revision:                1
Events:
  Type    Reason     Age    From                                       Message
  ----    ------     ----   ----                                       -------
  Normal  Issuing    5m46s  cert-manager-certificates-trigger          Issuing certificate as Secret does not exist
  Normal  Generated  5m46s  cert-manager-certificates-key-manager      Stored new private key in temporary Secret resource "traefik-dashboard-cert-mztdb"
  Normal  Requested  5m46s  cert-manager-certificates-request-manager  Created new CertificateRequest resource "traefik-dashboard-cert-fbjjl"
  Normal  Issuing    5m21s  cert-manager-certificates-issuing          The certificate has been successfully issued
Awesome, all done! Let’s now create our Traefik deployment files and register the dashboard as an Ingress route so we can reach it through the specified domain name.
We will create a new folder within our post_deployment folder and add a middleware.yml and ingress.yml file:
mkdir post_deployment/02_traefik && \
touch post_deployment/02_traefik/01_middleware.yml post_deployment/02_traefik/02_ingress.yml
Because the Traefik dashboard is exposed by default, we will add a general Kubernetes secret and a Traefik middleware to create simple basic auth protection.
You can add your own password there of course, by using a tool like htpassword. Traefik supports passwords hashed with MD5, SHA1, or BCrypt.
In middleware.yml add the following:
apiVersion: v1
kind: Secret
metadata:
  name: traefik-dashboard-auth
  namespace: traefik
data:
  # Login: raf | 123
  users: cmFmOiRhcHIxJGRiN1VMZzFGJDB6OUFtWUVLaWRTQ0h4RkpxODdGYTEKCg==
---
apiVersion: traefik.containo.us/v1alpha1
kind: Middleware
metadata:
  name: traefik-dashboard-basicauth
  namespace: traefik
spec:
  basicAuth:
    secret: traefik-dashboard-auth
Now add the ingress route configuration in 02_ingress.yml, of course changing your domain name again:
---
apiVersion: traefik.containo.us/v1alpha1
kind: IngressRoute
metadata:
  name: traefik-dashboard
  namespace: traefik
spec:
  entryPoints:
    - websecure
  routes:
    - match: Host(`traefik.yourdomain.com`)
      kind: Rule
      middlewares:
        - name: traefik-dashboard-basicauth
          namespace: traefik
      services:
        - name: api@internal
          kind: TraefikService
          port: 80
  tls:
    secretName: traefik-dashboard-cert
Let’s deploy 🚀
Alright with everything prepared now, let’s deploy our Ingress route and expose the Traefik dashboard! By running the command below, kubectl will first apply the middleware and then deploy the ingress route.
kubectl apply -f post_deployment/02_traefik/WOOHOO! We got it up and running. 🎯
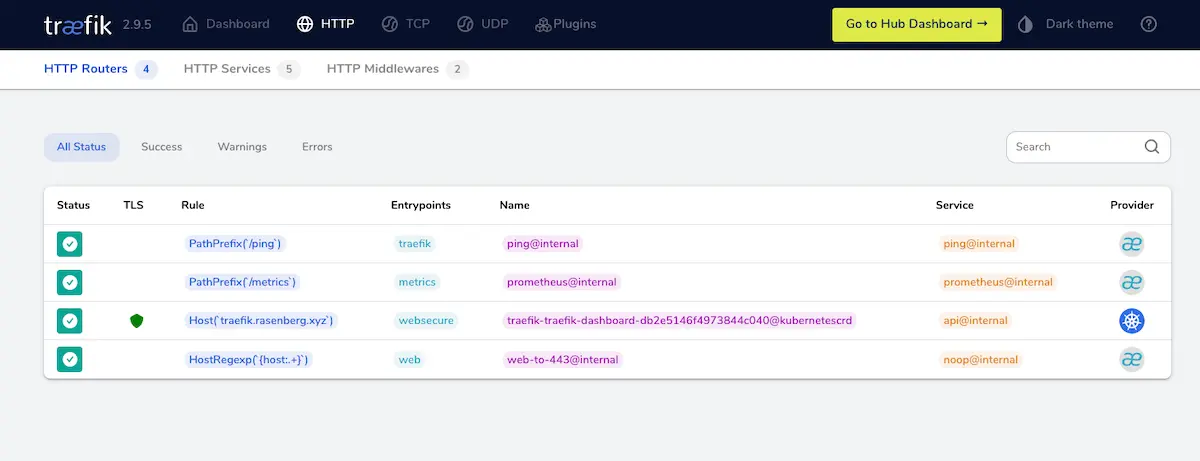
If you follow the domain name you will be greeted with a TLS encrypted route to the Traefik dashboard. After entering the basic auth username and password, the dashboard will be displayed. Awesome!
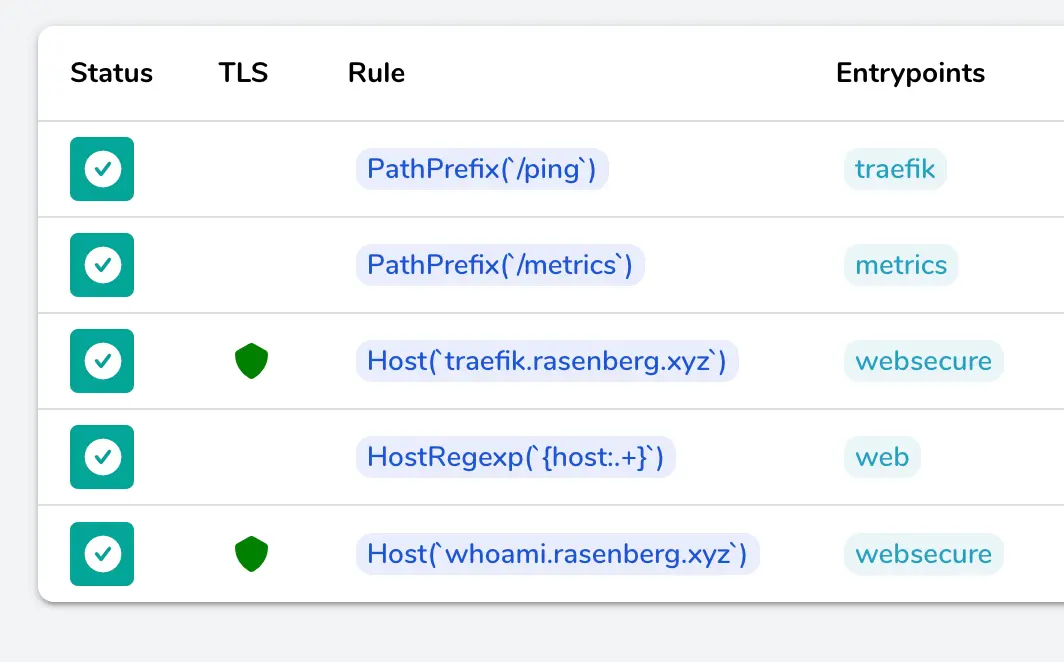
As you can see when you view the HTTP routers, you can see our dashboard route is safely secured with TLS and Traefik recognizes it as a Kubernetes route.
Example application
With the dashboard up and running, let’s deploy an example whoami application with TLS encryption. The first thing you have to do again, is to add a DNS entry for the whoami service. Then add the appropriate folder and files:
mkdir post_deployment/03_whoami && \
touch post_deployment/certificates/whoami.yml && \
touch post_deployment/03_whoami/01_whoami.yml post_deployment/03_whoami/02_ingress.yml
Time to create a new certificate. So add this to post_deployment/certificates/whoami.yml:
---
apiVersion: cert-manager.io/v1
kind: Certificate
metadata:
  name: whoami-cert
  namespace: whoami
  labels:
    "use-http01-solver": "true"
spec:
  commonName: whoami.yourdomain.com
  secretName: whoami-cert
  dnsNames:
    - whoami.yourdomain.com
  issuerRef:
    name: letsencrypt-prod
    kind: ClusterIssuer
Then add the following to 01_whoami.yml, inside the post_deployment/03_whoami folder:
kind: Deployment
apiVersion: apps/v1
metadata:
  name: whoami
  namespace: whoami
spec:
  replicas: 1
  selector:
    matchLabels:
      app: whoami
  template:
    metadata:
      labels:
        app: whoami
    spec:
      containers:
        - name: whoami
          image: containous/whoami
          imagePullPolicy: Always

---
apiVersion: v1
kind: Service
metadata:
  name: whoami
  namespace: whoami
  labels:
    app: whoami
spec:
  type: ClusterIP
  ports:
    - port: 80
      name: whoami
  selector:
    app: whoami
Then add the ingress route in 02_ingress.yml:
---
apiVersion: traefik.containo.us/v1alpha1
kind: IngressRoute
metadata:
  name: whoami
  namespace: whoami
spec:
  entryPoints:
    - websecure
  routes:
    - match: Host(`whoami.yourdomain.com`)
      kind: Rule
      services:
        - name: whoami
          port: 80
  tls:
    secretName: whoami-cert
Alright so before we are generating the certificate again, don’t forget to create the whoami namespace, since we are deploying to that and it isn’t there yet.
kubectl create namespace whoamiThen generate our certificate again:
kubectl apply -f post_deployment/certificates/whoami.ymlWait for some time and see if it is successfully issued:
kubectl -n whoami describe certificate whoami-certIf everything thing went well and your certificate was successfully issued, deploy the whoami service:
kubectl apply -f post_deployment/03_whoami/Awesome! 🔥 As you can see, the whoami service is available through the domain name, running over TLS:

You can see the service in the Traefik dashboard now as well:
And that’s a wrap folks. 🤝
Conclusion
In this blog post we configured a kubernetes cluster with the kubernetes traefik ingress controller.
We set-up all the required servies in the cluster first, and then exposed the Traefik dashboard. We installed TLS capability and configured ClusterIssuer. We then deployed an example application. Great work!
Hopefully, you learned enough from it so that you can build out your Kubernetes cluster yourself, matching your specific requirements. In the future, I will definitely post some more about it.
See you next time! 👋
Want to read some more? Check out my other posts.
Great Job! I found this easy & insightful to follow along.