Setting up a docker compose Traefik v2 reverse proxy together with Portainer. In this blog post we will dive into the world of containers. This is an easy to follow, step-by-step walkthrough.
Introduction
The lists below describe the environment and versions I used for this post, and potential other requirements.
Environment
The environment set-up is not set in stone. An older or newer version of a certain dependency may or may not work. The same applies to the system used, you might use a different OS, but certain steps could be different. Try to mimic your local environment as much as possible, to avoid any configuration errors unrelated to the post.
- Ubuntu: 22.04
- System: Digital Ocean $6 Droplet 1 GB / 1 CPU – Running Ubuntu 22.04 x64 – Packages installed with
apt
Other requirements
- DigitalOcean account
- Domain name
👉 The Github repo for this blog post
Today’s topic: docker compose Traefik v2
In this blog post we will dive into the world of containers. We will set-up a docker compose Traefik stack where Traefik will act as a reverse proxy, along side Portainer as an easy container management tool.
This set-up makes container management & deployment a breeze and the reverse proxy allows for running multiple applications on one Docker host. This really brings down the overall overhead that would normally go along with running multiple docker applications, since everything is managed from one point.
Traefik will route all the incoming traffic to the appropriate docker containers and through the open-source app Portainer you can speed up software deployments, troubleshoot problems and simplify migrations.
As an final example we will deploy a containerized fastapi app into our new environment. Exciting, so let’s start! 🚀
What is Traefik v2?
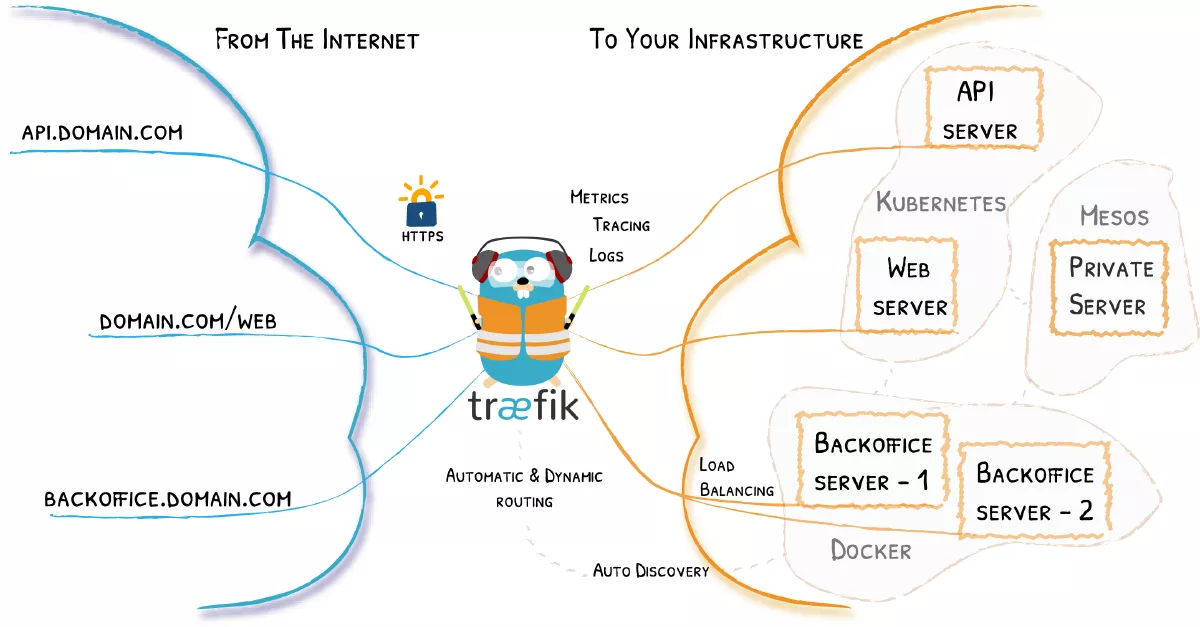
Traefik is a modern and lightweight reverse proxy and load balancer that makes deploying microservices very easy. It is designed to be as simple as possible to operate, but capable of handling large, highly-complex deployments.
It also comes with a powerful set of middleware that enhance its capabilities to include load balancing, API gateway, orchestrator ingress, as well as east-west service communication and more. It is written in Go and is packaged as a single binary file and available as a tiny official docker image.
Traditional reverse-proxies require that you configure each route that will connect paths and subdomains to each microservice. In an environment where you add, remove, kill, upgrade, or scale your services many times a day, the task of keeping the routes up to date becomes tedious. 😟
Traefik listens to your service registry/orchestrator API and instantly generates the routes so your microservices are connected to the outside world — without further intervention from your part.
Some of Traefik it’s features further explained:
- Dynamic Routing: Once properly set-up, Traefik will dynamically add new services and containers as they come up to provide traffic routing to them. Let’s say you have Traefik running and you want to add a new app, you just build your container and register a new endpoint and Traefik will automatically detect it and start routing traffic to it. This makes running a docker compose Traefik stack very powerful.
- Load balancer: If you have multiple instances of a container, then Traefik can provide load balancing between those instances.
- Let’s Encrypt: When properly configured, Traefik can not only route traffic to a newly discovered service, but also set up free SSL certs from Let’s Encrypt. Afterwards it can then redirect all the http traffic to https through middleware for enhanced security of your application.
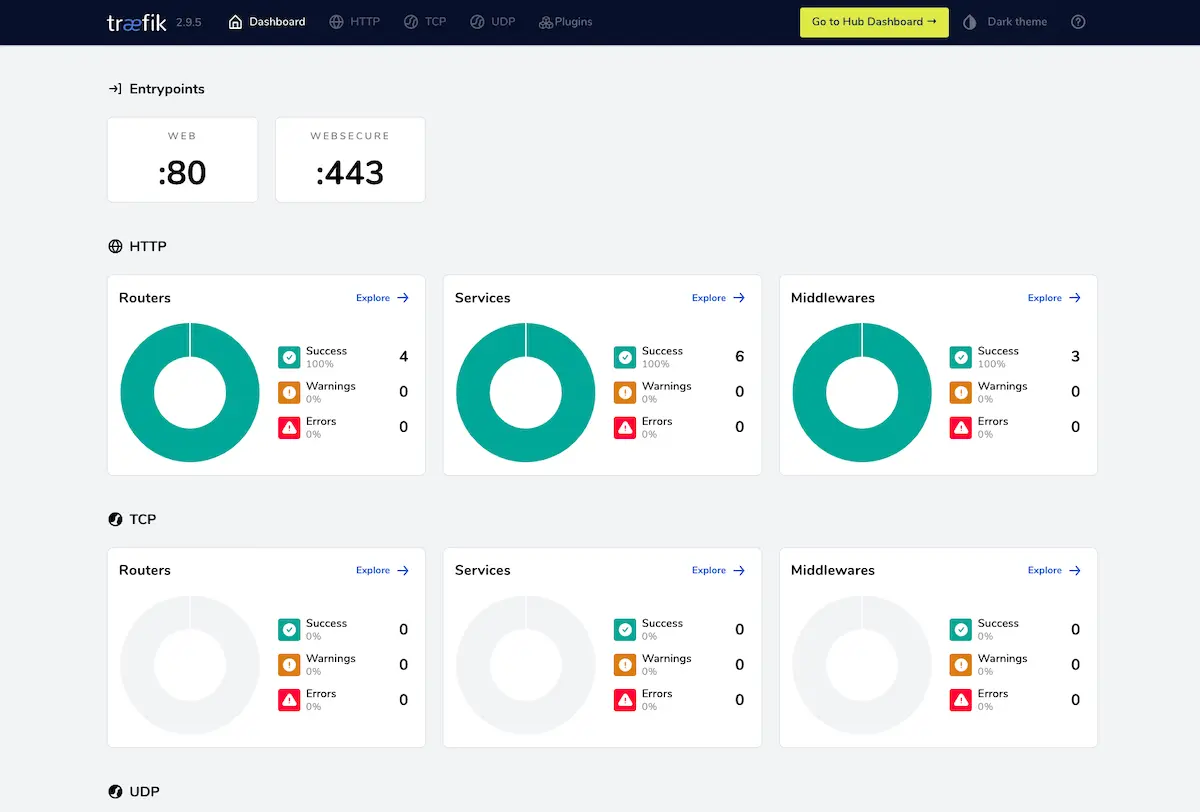
- Web UI: It comes packed with a very useful management dashboard that helps you visualize all the traffic endpoints, services, middleware and docker containers while showing potential warnings and errors as well.
What is portainer?
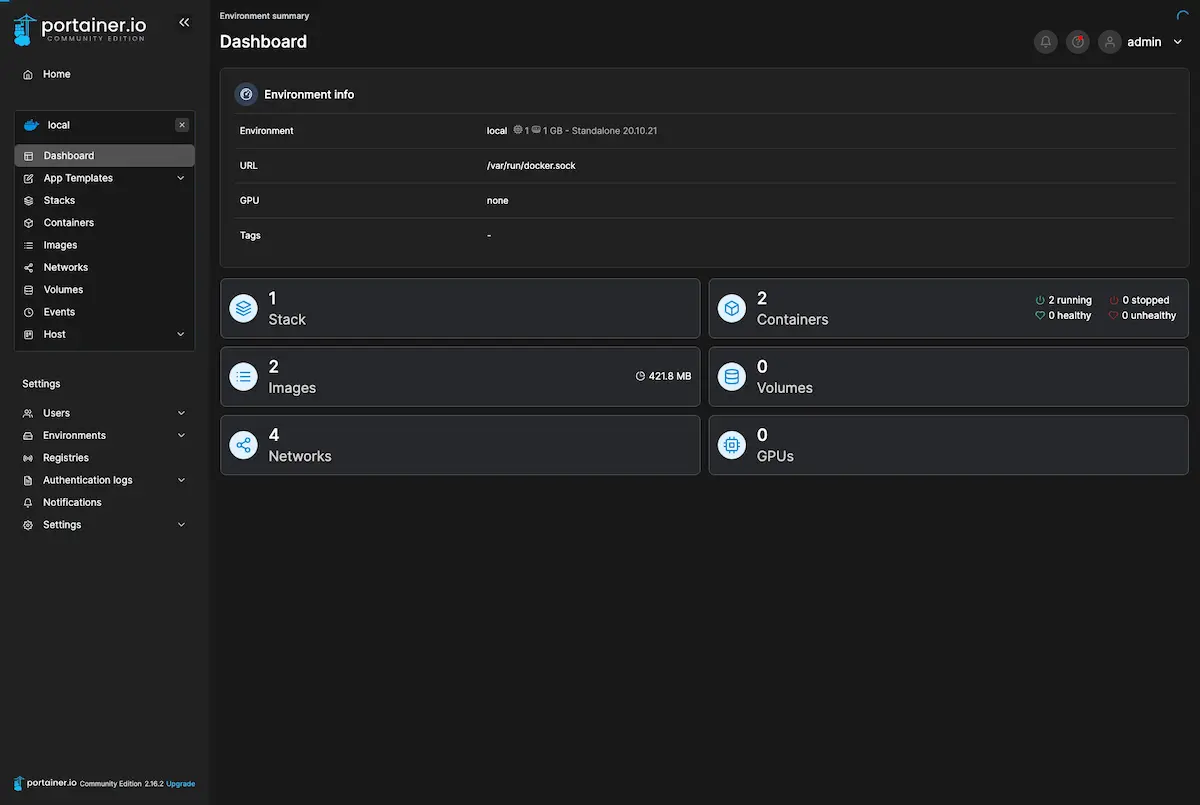
Portainer is a lightweight management UI which allows you to easily manage your Docker host or Swarm cluster.
It is meant to be as simple to deploy as it is to use. It consists of a single container that can run on any Docker engine. It allows you to manage your Docker stacks, containers, images, volumes, networks and more! This will help with speeding up software deployments, troubleshooting problems and simplifying migrations. 😍
Portainer works by hiding the complexity that makes managing containers hard behind an easy to use GUI. By negating the need for users to use CLI, write YAML or understand manifests, Portainer makes deploying apps and troubleshooting problems so simple, anyone can do it.
Building the stack
From this point on I am going to assume you have docker and docker-compose installed on your server, and you are running Ubuntu 22.04. I used a Digital Ocean $5 droplet for this. If you sign up through this link you can get $100 worth of credit for free on there!
A quick tutorial to install docker on Ubuntu 22.04 can be found here, and a tutorial to install docker-compose can be found here.
Note:
You might run into a problem later in this post when you try to execute any docker compose commands. Where the error will look similar to this:
docker: 'compose' is not a docker command.
See 'docker --help'
This can be fixed by running: sudo apt-get install docker-compose-plugin
You can read more about this problem, in this Github issue.
Setting up DNS records
Alright, time to start. The first thing to do is setting up the appropriate domains so we can access our Portainer and Traefik dashboard. Just pick one of the domains you have hoarded over the years. 😄
Set them up like this, in the form of an A record, pointing to your server:
traefik.yourdomain.com
portainer.yourdomain.com
Later, this will make the Traefik & Portainer dashboard available at the appropriate subdomains.
Creating a user & setting up the directory
Generally you want to avoid using your server as root, so register a user and add them to the sudo group, and then switch to that user:
adduser raf && \
usermod -aG sudo raf && \
su - raf
Now it’s time to set-up our directory. I already pre-created the configuration files and published it, so you can just clone or fork my repo. I will go over all the files to explain what is going on. So just run:
git clone https://github.com/rafrasenberg/docker-traefik-portainer ./srcNow cd into src and you should be greeted with this tree structure:
.
└── src/
    ├── core/
    │   ├── traefik-data/
    │   │   ├── configurations/
    │   │   │   └── dynamic.yml
    │   │   ├── traefik.yml
    │   │   └── acme.json
    │   └── docker-compose.yml
    └── apps/
File explanation
traefik.yml
The first file we will go over is the traefik.yml file as seen in the code snippet below. This is the static, base configuration of Traefik.
First we tell Traefik on line 2 that we want the Web GUI by setting dashboard:true
After that we define our two entrypoints web (http) and websecure (https). For our secure https endpoint we set-up the certResolver so we can enjoy automatic certificates from Let’s Encrypt! 😄 Next up on line 16 we load the appropriate middleware so that all our traffic will be forwarded to https.
In the providers part on line 20 we specify that this file will be passed to a docker container using bind mount. We also tell Traefik to find our dynamic configuration in configurations/dynamic.yml. And at last is the configuration for our SSL certificate resolver on line 27.
api:
  dashboard: true

entryPoints:
  web:
    address: ":80"
    http:
      redirections:
        entryPoint:
          to: websecure

  websecure:
    address: ":443"
    http:
      middlewares:
        - secureHeaders@file
      tls:
        certResolver: letsencrypt

providers:
  docker:
    endpoint: "unix:///var/run/docker.sock"
    exposedByDefault: false
  file:
    filename: /configurations/dynamic.yml

certificatesResolvers:
  letsencrypt:
    acme:
      email: raf@yourdomain.com
      storage: acme.json
      keyType: EC384
      httpChallenge:
        entryPoint: web
Note: Make sure to configure an email in this file for the Let’s Encrypt renewal. @yourdomain.com might throw an error when you want to run your docker container!
dynamic.yml
This file contains our middleware to make sure all our traffic is fully secure and runs over TLS. We also set up basic auth here on lines 11-14 for our Traefik dashboard, because by default it is accessible for everyone.
The file is fully dynamic and can be edited on the fly, without restarting our container.
# Dynamic configuration
http:
  middlewares:
    secureHeaders:
      headers:
        sslRedirect: true
        forceSTSHeader: true
        stsIncludeSubdomains: true
        stsPreload: true
        stsSeconds: 31536000
    user-auth:
      basicAuth:
        users:
          - "raf:$apr1$MTqfVwiE$FKkzT5ERGFqwH9f3uipxA1"

tls:
  options:
    default:
      cipherSuites:
        - TLS_ECDHE_ECDSA_WITH_AES_256_GCM_SHA384
        - TLS_ECDHE_RSA_WITH_AES_256_GCM_SHA384
        - TLS_ECDHE_ECDSA_WITH_AES_128_GCM_SHA256
        - TLS_ECDHE_RSA_WITH_AES_128_GCM_SHA256
        - TLS_ECDHE_ECDSA_WITH_CHACHA20_POLY1305
        - TLS_ECDHE_RSA_WITH_CHACHA20_POLY1305
      minVersion: VersionTLS12
docker-compose.yml
The most important file. This is where the good stuff happens. The beauty of Traefik is that once you have done the initial set-up, deploying new containers is very easy. It works by specifying labels for your containers.
version: "3.8"

services:
  traefik:
    image: "traefik:latest"
    container_name: traefik
    restart: unless-stopped
    security_opt:
      - "no-new-privileges:true"
    networks:
      - proxy
    ports:
      - "80:80"
      - "443:443"
    volumes:
      - "/etc/localtime:/etc/localtime:ro"
      - "/var/run/docker.sock:/var/run/docker.sock:ro"
      - "./traefik-data/traefik.yml:/traefik.yml:ro"
      - "./traefik-data/acme.json:/acme.json"
      - "./traefik-data/configurations:/configurations"
    labels:
      - traefik.enable=true
      - traefik.docker.network=proxy
      - traefik.http.routers.traefik-secure.entrypoints=websecure
      - traefik.http.routers.traefik-secure.rule=Host(`traefik.yourdomain.com`)
      - traefik.http.routers.traefik-secure.service=api@internal
      - traefik.http.routers.traefik-secure.middlewares=user-auth@file

  portainer:
    image: "portainer/portainer-ce:latest"
    container_name: portainer
    restart: unless-stopped
    security_opt:
      - "no-new-privileges:true"
    networks:
      - proxy
    volumes:
      - "/etc/localtime:/etc/localtime:ro"
      - "/var/run/docker.sock:/var/run/docker.sock:ro"
      - "./portainer-data:/data"
    labels:
      - traefik.enable=true
      - traefik.docker.network=proxy
      - traefik.http.routers.portainer-secure.entrypoints=websecure
      - traefik.http.routers.portainer-secure.rule=Host(`portainer.yourdomain.com`)
      - traefik.http.routers.portainer-secure.service=portainer
      - traefik.http.services.portainer.loadbalancer.server.port=9000

networks:
  proxy:
    external: true
For every container that you want Traefik to handle, you add labels so Traefik knows where it should route it. So when we look at the file above, let’s quickly check what is going on at the traefik container.
So we attach the first label on line 22, which tells Traefik that it should route this container because we specify enable=true. This is the result of the configuration in the static traefik.yml file where we explicitly stated exposedByDefault: false so therefore we have to specify that.
The second label on line 23 tells us that we should use the network proxy, which we will create later on. After that we tell Traefik to use our websecure endpoint (https). We then specify our host name with the appropriate domain on line 25. 👍
The final to last label specifies the API handler. It exposes information such as the configuration of all routers, services, middleware, etc. To see all the available endpoints you can check the docs.
The very last label on line 27 is our basic auth middleware, remember? Since the Traefik dashboard is exposed by default, we add a basic security layer over it. It will also protect our API.
Running the stack
Creating credentials
The first thing we should do is generate the password for basic auth that will be stored in the dynamic.yml file. These credentials will be required when trying to log into our Traefik Web UI and it will protect the API.
Make sure your server has htpasswd installed. If it doesn’t you can do so with the following command:
sudo apt install apache2-utilsThen run the below command, replacing the username and password with the one you want to use.
echo $(htpasswd -nb <username> <password>)Edit the dynamic.yml file and add your auth string under the user-auth middleware as seen in the example code.
Creating the proxy network
We need to create a new Docker network that will allow outside traffic. This should be called proxy as we specified in our docker-compose.yml file:
networks:
  - proxy
To create a docker network, use:
sudo docker network create proxyEditing the domain names
Open the docker-compose.yml file and make sure you replace the domain values in the Traefik labels to the domains that you send to the server as done earlier:
traefik.yourdomain.com
portainer.yourdomain.com
Giving the proper permissions to acme.json
By default the file acme.json has the permission set to 644, this will result in a error when running docker-compose. So make sure you set the permissions of that particular file to 600. cd into the core folder and run the following command:
sudo chmod 600 ./traefik-data/acme.jsonRunning the stack
Now it is time to run the stack. Make sure you are in the core folder so docker can find the docker-compose file. On the first run I always like to check the process for errors before we use the docker compose --detach flag. Run the following command:
sudo docker compose upRight now the Traefik dashboard should be available at traefik.yourdomain.com and Portainer at portainer.yourdomain.com, awesome! 🔥
When you are sure that your containers are running correctly, run them in the background by using the --detach option:
sudo docker compose down && sudo docker compose up -dAdding docker applications to our server
Alright, so our environment is all configured, let me now demonstrate how easy it is to deploy containers to our new docker compose Traefik set-up.
This is where the good stuff happens. I created a basic fastapi app locally with docker-compose.
After I pushed this to Github, it took me 2 minutes to deploy it and make it available to the world wide web. Can you believe that? TWO MINUTES! If all my deployments were that easy..
Anyway, here are the steps I took.
I pointed the domain I want to use for the app, to the server. For this example I used fastapi.domain.com.
On the server I switched to the apps folder and ran git clone
git clone https://github.com/rafrasenberg/fastapi-docker-example.git ./fastapiAfter that it was time to edit the docker-compose.yml file of the app:
version: "3.8"

services:
  fastapi:
    build:
      context: ./app
      dockerfile: ./Dockerfile
    ports:
      - "8484:8484"
    command: "uvicorn main:app --proxy-headers --host 0.0.0.0 --port 8484"
    volumes:
      - "./app/src:/usr/src/app"
Now you might be wondering, how should I approach this? For the whole Traefik config we only have to add 4 labels:
labels:
  - traefik.enable=true
  - traefik.docker.network=proxy
  - traefik.http.routers.fastapi.entrypoints=websecure
  - traefik.http.routers.fastapi.rule=Host(`fastapi.yourdomain.com`)
So what is happening here?
First we enable this container with enable=true, then we add it to the proxy network. After that we specify the routers and the entrypoints.
Note that this part: traefik.http.router.fastapi should have an unique router identification. So make sure you haven’t used that name yet. Let’s say you want to deploy the exact same app on a different domain and container instance, you could use this label: traefik.http.router.fastapi-two. Just make sure it’s an unique value.
Now the last part that we need to do in the docker-compose.yml file, is specifying the networks. So the final docker-compose.yml file will look like this:
version: "3.8"

services:
  fastapi:
    build:
      context: ./app
      dockerfile: ./Dockerfile
    command: "uvicorn main:app --proxy-headers --host 0.0.0.0 --port 8484"
    volumes:
      - "./app/src:/usr/src/app"
    ports:
      - "8484:8484"
    labels:
      - traefik.enable=true
      - traefik.docker.network=proxy
      - traefik.http.routers.fastapi.entrypoints=websecure
      - traefik.http.routers.fastapi.rule=Host(`fastapi.rafrasenberg.com`)
    networks:
      - proxy

networks:
  proxy:
    external: true
Now let’s run our container:
sudo docker compose up -dThat’s all! We only added a few labels to our docker-compose.yml file, and specified the network, and our container is deployed and ready to receive traffic. Awesome right! 👏
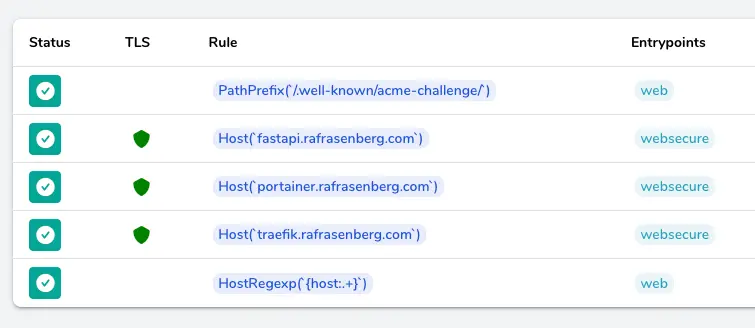
The great thing when working with docker compose Traefik, is that our new app is immediately showing up in the Traefik dashboard, secured with TLS, due to the auto discovery:
Now whenever you want to add a new applications on your server with the docker compose Traefik stack, just repeat the last few steps. Easy as that! 🚀
Conclusion
Let’s recap this.
We have set-up an awesome docker compose Traefik v2 stack for running and managing multiple docker containers on one server. Deploying new projects will be very easy after this initial set-up.
See you next time! 👋
Want to read some more? Check out my other posts.
Firstly Raf I can’t believe you have no comments on this post, it really is a masterpiece. I have been pulling what’s left of my hair out trying to wrap my head around the whole Ubuntu/Docker/Portainer thing, see I’m an admitted cPanel guy so this has been pretty foreign to me, but I’m plowing through. Articles like yours really help, so thank you for that, there is a lot of confusing information out there.
Ok, so ultimately I wanting the run Nextcloud for a small group of mine, I found a host with plenty of storage space on a VPS and dove in. I managed, over the next couple of days, to get Docker set up and running from scratch, then I heard that Portainer was the go to thing to use as a UI for Docker, so I managed to get that up and running, then I dealt with DNS with my registrar to point my domain to my static IP server with a A record and Cname. The next hurdle was of course SSL, so I fought with certbot and Letsencrypt for 2 days and finally got it running with a cert installed so I’m good for HTTPS. Now, I’m at the TRAEFIK thing to try and redirect my domain name to a secure connection for Nextcloud.
Traefik may be somewhat overkill for my particular use case, but I figure load for bear even if all you see at the moment is squirrels. So I have a couple of questions regarding your tutorial:
*Would you know if Ubuntu 20.04 would present a formidable challenge using the commands and steps you described?
*In the section about the DNS records you list the entries as sub domains, do I need to amend these records with my Registrar with an A record for each one like portainer.mydomain.com / traefik.mydomain.com / nextcloud.mydomain.com etc, or is this just something in the local setup.
*As such I already have admin users for portainer and nextcloud, would I just pass that info in or do I need to setup new users following your process?
I hope you can help a little, I apologize for the ridiculously long post but you’re one of the first people whose explanation and tutorial really makes sense so I’m taking advantage…
All the Best
Hey Tom! I’m happy to hear that the post was useful to you 🙂
I just recently refreshed my blog and moved away from the old platform I was on, but I still haven’t imported the old comments. So that’s why you are the first 😀
To answer your questions:
Thank you for your support, and have a wonderful week.
Thanks so much Raf for the reply..
The only other concern I have is with the SSL cert, which is deployed for my main domain only. Since I will be using sub domains do I now need a wildcard cert (*.mydomain.com) to cover these sub domains??
Thanks
Yes, you can either get a wildcard cert to cover all subdomains, which is very convenient. Or just get a single certificate for each subdomain.
Hi Raf, I’m plugging along, I’ll tell you this whole Ubuntu VPS thing has really gone from wanting to hang a picture to having to build a house.. lol But I digress, I got to the very last container run and I’m getting an error stating “yanl: line 7: did not find expected key” I will say I reorganized the file by moving ports: heading below the volumes: as it is in your example. The actual file had the ports: higher in the list, not sure if that makes a difference.
I was hoping running this would solve a problem I’m having getting apache2 started again as that is throwing error because port 80 is being taken by docker-proxy, idk if this will help that but I’d like to solve this first anyway.
Thanks again and thanks for adding the donate, it’s on the way..
Hey Tom, it’s hard to tell without looking at the file. But from the error you mention, it looks like some
yamlmarkup issue. Re-check if everything is aligned correctly and you are not having any extra spaces/tabs. Next thing to check is if you are using the right data type formats where needed. YAML markup can be eitherkey:valuepairs, list types or more complex dicts. You can read some more about markup here. Order doesn’t matter in a yaml file, so you should be able to move around the ports section (as long as correctly formatted).And thank you so much for your support! I really appreciate it 🙂
I wanted to thank you for this article.
Finally something that is well redacted, explained as it should and working as expected.
Coffee is on its way !
Thank you so much Manny, I appreciate your kindness 🙂
Thanks for the article, exactly what I’ve been trying to piece together myself over recent weeks.
Question for you, would you run fail2ban in a container or on the host itself?
For context I was planning on opening up ports 80 and 433 (and potentially a random port for SSH access) via iptables.
Hi Tom, I would say you’d probably want to enable that on the host level.
Perfect, thanks a lot Raf!
Great article! The only thing I’ve struggled with is working out where / how to introduce new rules for other services running inside my network that are not running within Docker. Could you give an example (if you have time) of how I would forward a subdomain to a particular IP address within my house? Thanks!
Never mind – I think I managed to work it out!
Awesome! I’m glad you figured it out Jonathan 🙂
Hi Raf,
thank you so much for this masterpiece !
My knowledge of Docker, Portainer was sufficient to do labs on my home setup, but your detailed explanations make me to go “prod”, as I can now expose some apps outside, securely.
For my setup, it lacks how to deal with apps/services behind Traefik but not on Docker (like Jonathan), but I’ll try to elegantly add this functionality to your work 🙂
Thank you so much!
Hi Jonathan,
as I want to do the exact same thing, could you add/explain how you get it work, please ?
Thanks in advance 🙂
I red this last year on Hashnode.
Yeah, I crossposted to hashnode & devto. Have since then deleted those. This is an updated version for 2023
This tutorial is very detailed, and I successfully deployed it according to the author’s tutorial. Thank you!
Thank you Sanjian! 🙂
Thank you for creating such a helpful and informative tutorial! Your clear explanations and step-by-step guidance made it easy to understand and follow along. I appreciate the time and effort you put into making this valuable resource available to others. Keep up the great work!
Thank you Seifeddine!
Hi raf!, thank you very much that was very helpful
colud you edit it so that Portainer Edge Agent works
I found this link that may be helpful https://docs.portainer.io/advanced/reverse-proxy/traefik
Hi Raf,
Any hints on why my certs don’t seem to want to renew? here at https://svcc.mobi, this cert keeps going out of date and showing as expired until I up and down my docker container. It still shows it was issued in May. I seem to missing the step where the certs just keep renewing.
Thanks your article was very useful. Thanks to your git repo I was able to get it working.
I tried to buy you a coffee but somehow Apple Pay did not approve. I’ll try later again.
Best regards
Izaak
Awesome job. Spinning up new instances of WordPress in less than five minutes, having a couple dozen subdomains running WordPresses, test WordPresses, netdata, Kuma on a single $12 monthly server. So cool.
A nice followup might be adding some challenging applications, maybe including a discussion forum. And once that forum is created, maybe use it. Make it a place for users to share their docker-compose files they’ve successfully created with others for use on this setup.
The net is starving for docker-portainer-traefik compose files. They just don’t exist.
Not sure why, but the Traefik setup doesn’t seem to always go out and fetch the Letsencrypt certificate on creation of new stacks, despite the same labels (with new routes and adjusted url). And looking into the acme.json file, the problem setups haven’t created a certificate. Seems to be a problem reaching port 80. Thoughts?
Hi,
Thx for this great explanation and tutorial, it’s save me for comprehension
When runing thiese conatner I get ” exec /entrypoint.sh: operation not permitted” ??? Any ideas ?
I am getting this error as well
✔ Container traefik Created
✔ Container portainer Created
Attaching to portainer, traefik
traefik | exec /entrypoint.sh: operation not permitted
portainer | exec /portainer: operation not permitted
Just want to leave a massive THANK YOU!
This has saved me so many hours, even though I was really close to get there myself.
After short configuration, everything works fine!
Raf, this setup is fantastic. Thanks! In a related video, you did an Authelia tutorial, but I was never able to make it work with this setup. Have you got the two working together? If so, is it possible to update this tutorial to include that authorization system?
Hi, I am trying to write a MERN stack local deployment using Docker and came across this blog post to write a reverse proxy using Traefik and Portainer. I am confused by the directions here. What is the file structure that I should follow? Do I “docker compose up” the docker-compose.yml file and then make a separate YML for my app? I tried doing that and it didn’t work. This is the application I am currently writing: https://github.com/AndrewTran03/vt-digital-assessment. Any suggestions would be greatly appreciated.
Hello, first of all, thank you very much for the wonderful article about the traefik/portainer tandem, probably the best that currently exists on the Internet. Could I ask you to contact me regarding teaching/cooperation in this area? Regards Piotr
Hey Raf, Awesome content here this really helped me get going. I’m having an issue with logging into the traefik web portal though. I am guessing it’s something to do with basic auth because with insecure enabled I can access the web portal. I’ve tried every combination of switches for htpasswd I could find, running the traefik documentation version and a few different file structures and nothing seems to work. Any thoughts or suggestions?
Excellent job, well done. Takes a little practice and research to get the stacks created correct.
One mystery that still remains concerns its integration with Cloudflare and proxying (orange cloud=on), and getting it to work.
First, proxying has to be turned off before acme.json file will show a new site has been issued a cert. You can also change the router word on the two lines in the labels to re-issue a new path and that often cures a lot of first time problems getting a cert and other things.
But how/when Proxying will work after that seems like a mystery. Sometimes, turning proxy on works fine, while other times it gives errors like “cypher mismatch.” (talking about the free tier of Cloudflare). Anyone else struggle with this?
Excellent walkthrough Raf!
I have been trying to find out how to run traefik via docker on my newly acquired Zuma which is running CasaOs, so whilst not everything translates, your help has been great and has helped massively. So a huge thanks!